Click on image for larger view.
Click on image for larger view.
There's several simple ways to add a handle to a blade, but first let's talk about safety. Blades are sharp. They're supposed to be sharp. You probably should tape up the blade before starting to work on it. Be careful anyway, the Scandinavian blades are really sharp and will cut through the tape if you grab them wrong. If you're working with hot solder or pewter, or power tools, wear safety glasses. The dust from some handle materials can be bad (sometimes VERY bad) for your lungs. Use good ventilation and/or a dust mask. When you're working with power tools or sharp stuff, pay attention to what you're doing. Don't try to work when you're tired or in a hurry.
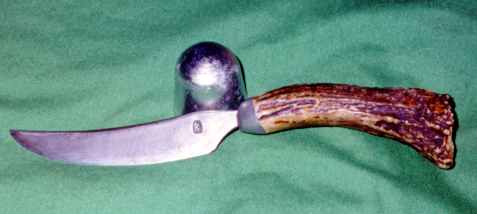
One of the easiest, and most attractive, ways to make a handle is with antler. Find a suitable piece of antler, drill a hole, and add the blade, and you're done. You can add a guard, or not, as you choose.
Here's how. Pick out the piece of antler and cut it to length. Before you cut it, lay the blade over the piece and see how the tang will fit. Try holding the section to see how it feels in your hand. If your piece of antler includes the crown, you can either place the crown at back of the handle as a pommel, or at the front of the handle as a natural guard. You may have to shorten or narrow the tang to fit in the available space. If you have to narrow the tang, be sure to file or grind parallel to the tang, not across it. Any scratch lines that cross the tang may weaken it, and cause it to break under stress. Drill the hole. I like to drill a narrow pilot hole, then widen it, but not all the way to the bottom. You may want to use several size drills so the hole tapers in steps. (I often taper the tang to match.) You can widen the hole at the opening with a narrow rasp or chisel to form a slot rather than a round hole. You only have to do this at the opening where the tang widens. Don't narrow the tang near the base of the blade, you need the strength there. As you enlarge the hole, try the blade for fit. When you can get it into position, you're ready for the next step.
There's several ways to bind the two together. If you don't care about tradition, epoxy works really well. It's a good idea to clean the tang to remove any oil or grease. If the tang is polished, you can roughen it with sand paper, or add a few shallow grooves, to give the epoxy a better grip. You can dye the epoxy if you wish, or add some of the powder from your drilling to help the epoxy to blend in. If you have taken the time to form a slot just large enough for the blade rather than an oversized hole, it will make a neater appearance.
I don’t think it matters very much what kind of epoxy you use, but it should be fresh and well mixed. If it comes out of the tubes stiff it’s already started to set up and should be discarded. I prefer to use a common brand purchased at a grocery or big box home supply store where it will turn over fairly quickly. I avoid specialty epoxies that may have sat on the shelves for months or years. I’ve recently tried a brand that comes with a nozzle that mixes it for you as you dispense it. It seems to work well, but of course you only get one use our of each nozzle (it comes with two). Epoxy is cheap compared to the cost of blades (not to mention the time and labor), and I don’t mind discarding any that has gone bad.
For a mire traditional piece you can use pitch, or sap from pine or spruce trees. A good approximation of this is ferrule cement. This is an early form of heat glue made for assembling fishing pole ferrules. It contains some kind of tree sap and is available in larger sporting goods stores. I've even used frankincense, and I suspect amber would work as well.
Another traditional method is poured pewter. This can be tricky, and probably isn’t the best choice for a first project. You get one try at the final moment to get it right. Position the handle vertically in a vise or other holder. Wrap foil around the handle to form a collar. Melt the pewter, pour it into the hole, quickly add the blade, and let it cool. It helps to heat the tang as well, so the pewter does not freeze instantly as you are inserting the tang. You need to be careful that the heat does not draw the temper of the blade. Concentrate the heat on the outer half if the tang. Let the assembly cool completely before removing the foil. It's best to leave it overnight, or at least for several hours. If you remove the foil before the core is cold the antler may split as it contracts from contact with the cooler air. If you use a little more pewter than is needed to fill the hole, it will form a cap over the end of the handle and hide the hole. You can also cut grooves in a decorative pattern in the handle that will be filled by the pewter. This also helps lock the assembly together. Alternatively you can assemble the knife first, then pour the pewter. I have trouble getting a clean fill this way because the pewter tends to freeze as soon as it contacts the blade. However I know several folks who do it this way and don't seem to have any trouble. Perhaps they get their pewter hotter than I do. Remember to use a lead free pewter if you're going to eat with the knife!
You can also split the difference and set the blade with epoxy, but only use enough epoxy to fill the handle within a quarter inch or so of the top, then finish with pewter. This saves pewter, and is very solid.
I've had some inquiries on how to melt the pewter. There are several ways depending on the tools at hand. I usually use a torch to melt some off the block into a stainless steel serving spoon or ladle. Then I apply the torch to the bottom of the spoon until the pewter is nicely fluid. If you didn't have a torch I suppose you could melt it on the kitchen stove with a ladle.
Knives assembled with pewter were quite common in the 17th - 19th centuries. Knives made this way would be would be very suitable for the American Colonial through Civil War periods.
Yet another alternative is to set the blade with epoxy, again leaving some space at the top. Then mix some of the dust from drilling the antler into some of the surplus epoxy and pack it in the top of the hole. This will match the color of the epoxy to the antler and make the size of the opening less obvious. If done properly, it will look as if the tang was forced into an exactly fitting hole.
If you want to do this in a more period fashion, you can soak the antler in sour buttermilk and vinegar for 6 - 12 weeks, at which time it should be soft enough to force the tang into the antler. After 4- 5 days it will regain it's hardness. This is a very ancient method of working antler for all kinds of artifacts. The folks on the Primitive Ways website suggest you can also do his by soaking the antler in rainwater for a month or so. I haven't tried these methods yet, but it's on my list of things to do. I'd be tempted to drill a pilot hole to insure the tang goes in straight.
Bone makes a very nice handle, and is mounted much the same as antler. Finish up with a nice polish for a mellow feel and look. If you are polishing on a power buffer, be very careful it doesn't grab the knife and feed it to you! When working with power grinders or buffers I try to stand to one side rather than in line with the rotation.
The leg bones from deer work very well with little work. On buckskinner reproductions, I've seen jaw bones of wolf, bear, raccoon, and others, used complete with teeth. This is very picturesque, but not very comfortable to use. I doubt that it was commonly done in the period.
Wood is a little more work, but gives you greater freedom to shape the style you want. Select a block, drill and fit to the blade, but don't glue it. Then shape and sand the handle, stain and glue it. You can bring the end of the tang through the end of the handle, and peen it down on a nut or washer. You can thread the tang for a recessed nut, but this isn't common for Scandinavian knives. An easier alternative is to drill the hole almost, but not quite, through the handle. Shorten the tang to match and bind the two together as with antler.
With wood, you may want to form the hole as a tight slot that just fits
the blade. This avoids the need for an end cap or hilt. With a snug fit, you
may not even need the pewter or epoxy. One of my customers tapers the tang
to a point and makes the hole just a bit short so he's actually driving the point
into the wood of handle. Of course if you overdo this you'll split the handle.
The result can be an elegant combination of blade, wood and shape. This style
is quite common in Scandinavia. Like the Japanese styles, it is deceptively simple looking.
The easiest way I've found to form the slot is with a drill press. Using a drill
the same size as the thckness of the tang (or just a bit thinnet) drill
two or three long holes in a line that converge at the bottom. Clean out the material between
them to form the slot. You can use a combination of narrow chisels and rasps
to clean out the space between the holes and open it up for an exaxt fit. Chain
saw files work well for this You may want to grind a round file flat on two sides
and taper the other dimention on one side as well. Recently I’ve been experimenting with zip cutters.
These look like drill bits with teeth along the shank. They are used by dry wall installer to
make opening for electrical switches, etc.
You may want to taper the tang, but avoid removing material at the base of
the blade where strength is needed.
If you are using a drill press, you can make a simple tool to greatly ease the work. Clamp a block of scrap wood to the table of the press. Drill a shallow hole in the wood and fit a stub of nail or drill rod in the hole, leaving a little sticking out. Lower the table, but keep the stub in line with the drill. Now when you are drilling the handle, drill a shallow (1/8" or so) reference hole in the other end of the handle first. Place this hole over the nail and you will be sure of your hole direction. This makes it much easier to drill converging holes to form a slot. It also is a great help when you are trying to drill through a handle from two ends and get the holes to line up properly. If you are making a handle with a blind hole you can still use this to keep the hole in line. Just leave the handle a bit long until you drill the hole for the tang, then remove the surplus with the reference hole.
An alternative is to burn the slot. This was often done in early times since long drills (or drills of any kind) were not always available to the maker. Today, it's easiest if you first drill a hole, then burn the hole into a slot. This is how the Helle factory did the Viking handles. You can use a piece of steel shaped like the tang, heated to a nice red. Press it in the hole until you are almost where you want the blade to sit, then clean out the char to the final fit. It may take a few passes. Unless you are using a blade that will be heat treated later, do not use the blade you are going to mount. The heat will ruin the temper of the blade. If you are doing a number of knives with the same blade, I suppose you could sacrifice one of the blades as a burning iron, but it seems a waste. It shouldn't take long to file or grind a piece of mild steel to the shape of the tang.
I've done few this way, but I prefer to drill and rasp the hole. Svein Helle tells me burning the holes was not a very popular job at the factory either. The handles for the Viking model were done this way.
Adding a metal hilt or guard is a little more work. You may decide not to bother. You may be able to form a guard from the handle material if you have the right piece of antler or shape the wood properly. Many period knives did not have a guard, just as many kitchen knives today do not have guards. People learn not to cut themselves. Also a large guard, or a double guard will limit the ways you can grip the knife, and gets in the way of certain kinds of cuts. It also limits the kind of sheath you can make. Of course if you decide not to use a guard, and do cut yourself, it was your choice. I am not responsible for your ineptitude. If you aren't sure you, and the next owners, of the knife can safely handle a knife without a guard, be sure to use one! My lawyer made me say that.
If you use a guard it should fit exactly, with little or no gap between the guard and blade. Because of the polishing. many blades are thinner at the point where the guard sits than they are through the tang. This means you will have to thin the tang to match the blade in order to slide the guard into place. Some blades have a squared portion at the base called a ricasso. This makes it easier to to fit a guard neatly. If your blade does not have a ricasso you may find the grind cross-section doesn't go very far up the tang. You will have to file the tang to match the grind to get the guard into place. This sounds confusing, but if you look at some of the blades without a ricasso it should make more sense. When filing the tang be sure to file or grind along the length, not across it. Filing across the tang can weaken it.
If you are using a pre-made guard, try to get one with a slot a bit undersized so you can open it up to an exact fit. You can also make your own from scratch. Brass is an easy metal to work. Drill a line of holes a little smaller than the thickness of the blade. File the holes into a slot for the tang. You want it to fit with no slop or gaps. Getting it to fit without noticeable gap is fussy work, but important. When you have a good fit, shape the guard. If you use power equipment avoid breathing the dust, and wear eye protection! Brass slivers are non-magnetic and really difficult for the hospital folks to get out of your eye. Remove the filing or grinding marks with successively finer grades of abrasive paper. Be sure to get all the marks out before going to the next finer grit. You can seal the joint between the blade and guard so moisture cannot get in and rust your tang. Soldering is the usual method. Silver solder is the strongest, but requires a high temperature. If your joint is good and tight, you can probably use soft solder. Remember to use lead free solder if the knife may be used on food. Clean the parts of all grease and oil. You want to heat the joint without heating the blade to the point where you ruin the temper. It helps to wrap the blade in a wet paper towel. It also helps to use a very small tip on an oxy-acetylene torch, rather than a propane torch, but either will work, especially with soft solder. Flux and assemble the joint. Keep the flux off the surfaces where you don't want solder. Set the blade vertically in a vise, and apply heat. When hot, apply solder to the tang side of the join. If your joint is tight, capillary action will draw in the solder to just fill the joint, leaving no gaps and no mess on the blade side of the guard. You can also use epoxy or even superglue if your joint is tight enough.
While fitting a guard adds work, it does simplify making the hole through the handle. Rather than fitting the hole closely to the tang, you can make it bit oversize, and fill the spaces with epoxy.
If the tang runs the full length of the handle you will need a pommel and/or end nut. A pommel usually covers the end of the handle, while an end nut does not. The pommel will usually be secured by an end nut, but the Finnish puukkos and leukus often use a large flat washer as both pommel and end nut. The end nut or washer can be secured to the tang by threads, but it’s more common to simply press it over the tang and peen the tang to anchor it. It should be a snug fit so a little bit of peening will anchor it solidly. Most factories use a round hole in the pommel, end washer or end nut, and turn the end of the tang accordingly. It’s usually stronger and more stable if you keep the end of the tang square or rectangular and file the hole to match. The tang is sometimes hardened with the blade and this will make it very difficult to peen the end. The cure for this is to anneal the end of the tang by heating it to a cherry red and cooling it very slowly. You only want to heat the last quarter inch or so, and a propane torch, or even a kitchen gas range will work fine. The blade needs to be held solidly to peen the tang. I’ve had good results by wrapping the blade in fiber reinforced packing tape to protect the finish, then using hardwood blocks in a heavy vise cranked down really hard. Peening the end is best done with a really light hammer of about 8 ounces. I like to finish the peening with angled strikes that form a low four-sided pyramid for a neat appearance.
If you are doing historical styles, try to look at as many originals as possible. Knives (and other artifacts) of different periods have their own feel and presence. The only way to obtain this is to become familiar with as many examples as you can. It's much better if you can actually handle the knives rather than look at pictures. Most early knives are much lighter and quicker in the hand than most reproductions. If you call ahead you can sometimes arrange with museums to examine the collection.
You may decide to do pseudo historical styles. Many buckskinning knives have no historical parallel, but are instantly recognizable by all concerned. Likewise, the popular pattern welded double-edged Viking dagger never existed in the real world. (At least I've never been able to find one. The closest I've come is some pre-viking Bronze Age daggers, and earlier still Danish flint daggers.)
Pseudo historical styles are not necessarily bad if that's what you or your customers want. I own a lovely Viking dag by the "Magik Badger" and enjoy it greatly. I also have a very nice neck knife by "Peddler" that I doubt has any historical precedent. (It's similar to Dan'l Winkler's style.) Just be sure you know the difference and don't misrepresent what you're making.
Modern styles give you a lot of freedom. It's really hard to come up with anything truly new in the way of a straight knife, but new combinations can be fun. You can carve or inlay the handle as your fancy dictates, use exotic woods or materials etc.
Have fun!
Here's a good tutorial with pictures.
Better still, here's a video of the complete process.
And here's a quck over-view of the process with an emphasis on the finish. Nice work!
And here's a great tutorial on making birch bark handles.
There are also some excellent tips on the Scandinavian Knife Forum.
Click here to return to the Blade Catalog
Click here to return to the Catalog Index